In this article, we'll be showcasing several key lighting patterns essential for portrait photographers to master. We'll delve into Loop lighting, Butterfly lighting, Rembrandt lighting, Split lighting, Short Lighting, Broad lighting, and Horror lighting. Understanding these patterns can greatly assist you in deciding how to approach photographing individuals
Here, we'll explore the optimal scenarios and techniques for implementing these lighting patterns, considering which face shapes they complement best. Additionally, we'll delve into the thematic aspects, focusing on the mood and atmosphere each lighting pattern can evoke in your photographs.
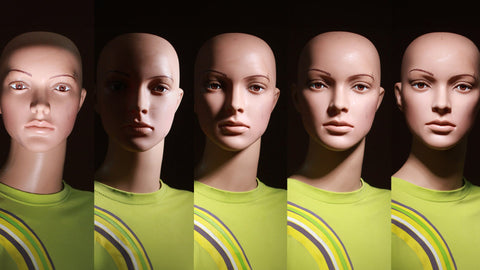
Please be aware that, for demonstration purposes, a single hard directional light source was utilized to provide a clearer visual representation of these lighting patterns. Unless you prefer a less dramatic and shadowy effect, consider using a larger and softer light source, supplemented with a fill-in light.
Butterfly Lighting


How to do Butterfly Lighting
Where to Place the Light Source : Position the light source directly above and slightly in front of your subject, casting a downward shadow under the nose that resembles a butterfly's wings.
Distinguishing Features : Butterfly lighting is characterized by the symmetrical shadow that forms under the subject's nose, creating a distinctive butterfly-shaped pattern.
Advantages of Butterfly Lighting : This technique produces a soft, flattering illumination that minimizes imperfections on the subject's face. It can add a touch of elegance and sophistication to portraits, particularly for subjects with defined cheekbones.
Emotional Impact : Butterfly lighting often conveys a sense of classic beauty and timeless elegance. The soft, even illumination can evoke feelings of warmth and serenity in viewers.
What to Avoid : Be cautious of positioning the light source too high, as it can create unflattering shadows under the eyes. Additionally, excessive shine on the forehead or nose should be minimized to maintain a natural look.
Faces Suited for Butterfly Lighting : This lighting pattern typically complements subjects with well-defined facial features and symmetrical bone structure. It can accentuate cheekbones and create a flattering glow on the skin.
Faces Less Suited for Butterfly Lighting : Individuals with prominent facial imperfections or asymmetrical features may not benefit as much from butterfly lighting, as it can accentuate these flaws. Additionally, subjects with narrow faces or pronounced facial lines may not achieve the desired effect with this technique.
Loop Lighting


How to do Loop Lighting
Where to Place the Light Source : Position the light source slightly to the side of your subject, around 30-45 degrees from the camera, at a height slightly above eye level.
Distinguishing Features : Loop lighting creates a small, crescent-shaped shadow on the cheek opposite the light source, forming a loop-like pattern. This shadow extends from the nose to the cheek, creating a gentle transition between light and shadow.
Advantages of Loop Lighting : Loop lighting is versatile and flattering for most subjects, providing a balance between light and shadow that enhances facial features without creating harsh contrasts. It adds dimension and depth to portraits, creating a natural and appealing look.
Emotional Impact : Loop lighting often conveys a sense of warmth and intimacy in portraits, evoking feelings of connection and approachability. The soft, gentle shadows can create a serene and inviting atmosphere.
What to Avoid : Avoid placing the light source too high or too low, as this can create unflattering shadows or highlights. Additionally, be mindful of the angle of the light to ensure the loop shadow falls naturally on the subject's face.
Faces Suited for Loop Lighting : Loop lighting is well-suited for a wide range of facial shapes and features. It can soften angular features and highlight the contours of the face, making it particularly flattering for subjects with round or square faces.
Faces Less Suited for Loop Lighting : While loop lighting is generally flattering for most subjects, individuals with very prominent or asymmetrical features may benefit more from other lighting techniques. Additionally, subjects with deep-set eyes or pronounced facial creases may find loop lighting less effective in minimizing shadows and highlights.
Rembrandt Lighting


How to do Rembrandt Lighting
Where to Place the Light Source : Position the light source to one side of your subject, around 45 degrees from the camera, at a height slightly above eye level.
Distinguishing Features : Rembrandt lighting creates a triangular patch of light on the cheek opposite the light source, with a small triangle of shadow under the eye on the same side. This triangle of light and shadow is a hallmark of Rembrandt lighting.
Advantages of Rembrandt Lighting : Rembrandt lighting adds depth and drama to portraits, creating a classic and timeless look reminiscent of the paintings of Rembrandt. It emphasizes the contours of the face, adding dimension and interest to the image.
Emotional Impact : Rembrandt lighting often conveys a sense of mystery and intrigue, drawing the viewer's attention to the subject's eyes and facial expressions. The interplay of light and shadow can evoke feelings of depth and complexity, adding emotional depth to the portrait.
What to Avoid : Avoid placing the light source too far to the side, as this can create harsh shadows or flatten the features of the face. Additionally, be mindful of the angle of the light to ensure the triangular patch of light falls naturally on the subject's cheek.
Faces Suited for Rembrandt Lighting : Rembrandt lighting is well-suited for subjects with defined facial features and strong bone structure. It can accentuate cheekbones and jawlines, creating a sculpted and striking appearance.
Faces Less Suited for Rembrandt Lighting : Individuals with very round or flat faces may find Rembrandt lighting less flattering, as it can accentuate the lack of contours. Additionally, subjects with prominent facial imperfections or asymmetrical features may benefit more from softer lighting techniques.
Side or Split Lighting


How to do Split or Side Lighting
Where to Place the Light Source : Position the light source to one side of your subject, around 90 degrees from the camera, at a height slightly above eye level.
Distinguishing Features : Split lighting divides the face into two equal halves, with one half illuminated and the other half in shadow. The line of division between light and shadow runs vertically down the center of the face.
Advantages of Split Lighting : Split lighting creates a dramatic and bold look, emphasizing the contrast between light and shadow. It adds depth and texture to portraits, highlighting the contours of the face and creating a sense of mystery and intrigue.
Emotional Impact : Split lighting often conveys a sense of strength and intensity, drawing the viewer's attention to the subject's features and expressions. The stark contrast between light and shadow can evoke feelings of power and authority, making it well-suited for dramatic portraits.
What to Avoid : Avoid placing the light source too close to the subject, as this can create harsh shadows or wash out the features of the face. Additionally, be mindful of the angle of the light to ensure the split falls naturally on the subject's face.
Faces Suited for Split Lighting : Split lighting is well-suited for subjects with angular or defined facial features. It can accentuate cheekbones, jawlines, and other facial contours, creating a sculpted and striking appearance.
Faces Less Suited for Split Lighting : Individuals with very round or flat faces may find split lighting less flattering, as it can exaggerate the lack of contours. Additionally, subjects with prominent facial imperfections or asymmetrical features may benefit more from softer lighting techniques.
Short Lighting


How to do Short Lighting
Where to Place the Light Source : Position the light source to one side of your subject, around 45-90 degrees from the camera, at a height slightly above eye level.
Distinguishing Features : Short lighting illuminates the side of the face turned away from the camera, with the side facing the camera in shadow. This creates a visually striking contrast between light and shadow, emphasizing the contours of the face.
Advantages of Short Lighting : Short lighting adds depth and dimension to portraits, highlighting the features of the face and creating a sense of drama and intensity. It can accentuate cheekbones, jawlines, and other facial contours, creating a sculpted and flattering appearance.
Emotional Impact : Short lighting often conveys a sense of mystery and intrigue, drawing the viewer's attention to the subject's features and expressions. The contrast between light and shadow can evoke feelings of depth and complexity, adding emotional depth to the portrait.
What to Avoid : Avoid placing the light source too close to the subject, as this can create harsh shadows or wash out the features of the face. Additionally, be mindful of the angle of the light to ensure the short side of the face is well-illuminated.
Faces Suited for Short Lighting : Short lighting is well-suited for subjects with defined facial features and strong bone structure. It can accentuate cheekbones, jawlines, and other facial contours, creating a sculpted and striking appearance.
Faces Less Suited for Short Lighting : Individuals with very round or flat faces may find short lighting less flattering, as it can exaggerate the lack of contours. Additionally, subjects with prominent facial imperfections or asymmetrical features may benefit more from softer lighting techniques.
Broad Lighting


How to do Broad Lighting
Where to Place the Light Source : Position the light source to one side of your subject, around 45-90 degrees from the camera, at a height slightly above eye level.
Distinguishing Features : Broad lighting illuminates the side of the face facing the camera, with the side turned away from the camera in shadow. This creates a visually balanced lighting pattern, with both sides of the face receiving light.
Advantages of Broad Lighting : Broad lighting creates a flattering and even illumination across the face, minimizing imperfections and creating a soft and natural look. It is ideal for subjects with round or full faces, as it can help to slim the face and accentuate facial features.
Emotional Impact : Broad lighting often conveys a sense of warmth and approachability, drawing the viewer's attention to the subject's features and expressions. The soft, even illumination can create a relaxed and inviting atmosphere, making it well-suited for portraits that aim to convey a sense of comfort and familiarity.
What to Avoid : Avoid placing the light source too far to the side, as this can create harsh shadows or flatten the features of the face. Additionally, be mindful of the angle of the light to ensure the broad side of the face is well-illuminated.
Faces Suited for Broad Lighting : Broad lighting is well-suited for subjects with round or full faces, as it can help to slim the face and accentuate facial features. It is also ideal for subjects who prefer a softer and more natural look in their portraits.
Faces Less Suited for Broad Lighting : Individuals with very angular or defined facial features may find broad lighting less flattering, as it can minimize the appearance of contours. Additionally, subjects with prominent facial imperfections or asymmetrical features may benefit more from other lighting techniques.
Horror Lighting


How to do Horror Lighting
Where to Place the Light Source : Position the light source at a low angle below the subject or slightly to the side, casting eerie and dramatic shadows across the face.
Distinguishing Features : Horror lighting creates intense and ominous shadows, often exaggerating facial features and creating a sense of dread and unease.
Advantages of Horror Lighting : Horror lighting is ideal for creating dramatic and atmospheric portraits that evoke feelings of fear, suspense, and tension. It can be used to enhance the mood and atmosphere of horror-themed photoshoots or to add a touch of darkness to artistic portraits.
Emotional Impact : Horror lighting often elicits a visceral response from viewers, invoking feelings of fear, apprehension, and discomfort. The stark contrast between light and shadow creates a sense of mystery and foreboding, drawing the viewer into the scene.
What to Avoid : Avoid using horror lighting for portraits intended to convey warmth, comfort, or positivity, as it can create an unsettling and disturbing atmosphere. Additionally, be mindful of the subject's comfort level when using horror lighting, as it can be intense and emotionally draining.
Faces Suited for Horror Lighting : Horror lighting is well-suited for subjects who are comfortable with intense and dramatic lighting effects, as well as for portraits intended to convey a sense of darkness or unease.
Faces Less Suited for Horror Lighting : Individuals who are sensitive to intense lighting or who are uncomfortable with horror-themed imagery may find horror lighting less suitable for their portraits. Additionally, subjects with very prominent facial imperfections or asymmetrical features may find horror lighting less flattering, as it can exaggerate these flaws.
Experiment! Experiment! Experiment!
Now that you've grasped the basic idea, it's important to remember that what works for one face may not work for the next. On the day of the shoot, experiment with different angles to find what works best for your subject
You might also want to experiment with different light modifiers, especially larger and softer light sources. Additionally, consider incorporating a second light source (fill-in light) to help minimize the boldness of the shadows.
For an example, here is an example of butterfly with the addition of a fill-in light. This is otherwise known as clamshell lighting or paramount lighting.

In summary...
As a portrait photographer, mastering various lighting patterns is essential for capturing compelling and visually stunning images. In this comprehensive blog post, I've explored seven key lighting patterns that every people photographer should know: Loop, Butterfly, Rembrandt, Split, Short, Broad, and Horror lighting.
Each lighting pattern offers unique advantages and can evoke different emotions in your portraits. From the classic elegance of Rembrandt lighting to the intense drama of Split lighting, understanding these patterns allows you to create portraits that truly stand out.
However, it's important to remember that there's no one-size-fits-all approach in portrait photography. What works for one subject may not work for another. That's why experimentation is key. On the day of the shoot, don't be afraid to try different angles, light modifiers, and even incorporate a second light source to achieve the desired effect.
By mastering these lighting patterns and experimenting with different techniques, you'll be able to elevate your portrait photography to the next level, capturing stunning images that truly showcase the beauty and personality of your subjects.

Comments (0)
There are no comments for this article. Be the first one to leave a message!